Wednesday, August 19, 2009

Better Flash Compatibility for 64-bit Linux

It's pretty easy to install Adobe Flash in Ubuntu, but unfortunately the version that's used by default has some bugs on 64-bit systems and crashes often (at least on my system). The problem is that Adobe hasn't officially released a 64-bit version of the plugin for Linux, and something called NSPluginWrapper has to be used to get it to play nice.

Fortunately, Adobe has been working on a 64-bit version for some time, and you can get the pre-release at their Adobe Labs site. The trick is to replace the old implementation with this one. Below is a little script that will do it all for you. Follow along and run the commands manually, or save it and run as root (no arguments required).
#!/bin/bash

# This URL points to the most current version of the plugin as of 8/20/2009. Check the link at the bottom of http://labs.adobe.com/downloads/flashplayer10.html for the latest version and replace it here.
PLUGIN_URL=http://download.macromedia.com/pub/labs/flashplayer10/libflashplayer-10.0.32.18.linux-x86_64.so.tar.gz
PLUGIN_DIR=/usr/lib/mozilla/plugins

if [ "`whoami`" != "root" ]; then
echo "You must run this script as root (sudo). Nothing will be done."
exit
fi

# First, we must remove the default flash plugin if its already installed.
# If you installed the plugin manually make sure you remove it manually prior to running this script. You can do this by deleting it from /usr/lib/mozilla/plugins/
echo "Removing old Flash plugins..."
echo "-----------------------------"
apt-get --assume-yes --quiet remove flashplugin-nonfree flashplugin-installer
echo "-----------------------------"

# Now lets download and extract the plugin to the correct location in one fell swoop.
echo "Downloading and installing plugin..."
echo "-----------------------------"
wget --output-document=- $PLUGIN_URL | tar --extract --gunzip --directory $PLUGIN_DIR
echo "-----------------------------"

echo "Please restart all instances of Firefox for changes to take effect."
If you decide to install a different version of flash, remember to delete this plugin. Simply remove /usr/lib/mozilla/plugins/libflashplayer.so.

Tuesday, August 18, 2009

Waste Less Space in Firefox

Screen real estate is expensive, especially vertical real estate on today's widescreen monitors. I've been trying to stick with 4:3 because they let met see those extra few lines of code or text. Anyway, all of the different toolbars on todays browsers, especially Firefox really bug me.

First, lets take a look at what I mean. Below is what Firefox looks like by default. There is plenty of space by the menu, but the Bookmarks Toolbar is hanging out all by itself (in red):
First, lets get into UI customization mode. In the menu go to View->Toolbars->Customize... and you'll notice a dialog called "Customize Toolbar" come up. Don't worry, we don't actually have to deal with it:

Now we can drag the bookmarks where we want them:
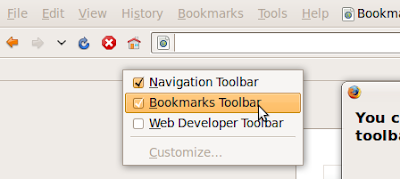
And finally, lets get rid of the now empty Bookmarks Toolbar. Right click on where your bookmarks used to be, and uncheck "Bookmarks Toolbar":
Now we can close the "Customize Toolbar" dialog and see our results:
Yay, more space! You can do something similar in Internet Explorer, but I'll leave that to you to figure out. In fact, you can even rearrange the buttons and location bar in Windows Explorer to save space when you're looking through your files.

Saturday, August 8, 2009

Firefox Addons for Prism

If you havent tried Mozilla's Prism yet, I suggest you do. Basically it lets you run webapps more like a desktop application instead of having to run it in your browser that's already cluttered with a ton of tabs. I have stuff I use often like Gmail, Facebook, and VMware Server Console set up as Prism webapps and I find it alot easier to get to them instead of having to open my Firefox window and then wade through a bunch of tabs.

Unfortunately, Prism currently doesnt support FF addons (extensions) yet, but luckily will in the future. However, most addons should just work since both FF and Prism are based on the same subsystems. So...lets go ahead and fool Prism!

First, download the addon .XPI file. This file is really a .ZIP, so feel free to rename it or just open it with your favorate archive viewer. Inside you should find a file named install.rdf. This is where all the magic happens as it defines the target application for the addon. Open the file in a text editor and you should see something like this:
<em:targetapplication>
<!-- Firefox -->
<description>
<em:id>{ec8030f7-c20a-464f-9b0e-13a3a9e97384}</em:id>
<em:minversion>3.0a1</em:minversion>
<em:maxversion>3.0.*</em:maxversion>
</description>
</em:targetapplication>
The two lines that conserve us are the em:id, and versions. Prism checks these values to make sure they match to what it expects. If it doesnt it tells you to go away! After digging around a bit I found the values that are needed for Prism:
<em:targetapplication>
<!-- Prism -->
<description>
<em:id>prism@developer.mozilla.org</em:id>
<em:minversion>0.4</em:minversion>
<em:maxversion>1.0.0.*</em:maxversion>
</description>
</em:targetapplication>
You can have more than one targetApplication tag, so just add the above right after the one for Firefox in your addon and you're all set!

If you're not sure how to do the above, or are just lazy you can use the script below to convert the .XPI automatically! Unfortunately this will only work on linux so Windows and Mac people will have to stick to the instructions above.
#!/bin/bash
xpiFile=$1
tempDir=`mktemp -d`
tempZipFile=`mktemp`
tempRdfFile=`mktemp`

function cleanup {
# get rid of temporary working files
rm -rf $tempDir $tempZipFile $tempRdfFile > /dev/null
}

# make sure the XPI exists
if [ ! -e "$xpiFile" ]; then
echo "$xpiFile does not exist"
cleanup
exit
fi

# extract the files from the original package
unzip -d $tempDir $xpiFile > /dev/null

# make sure what you need is there
installRdfFile="$tempDir/install.rdf"
if grep -q "prism@developer.mozilla.org" $installRdfFile; then
echo "$xpiFile is already compatible with Prism, doing nothing"
cleanup
exit
fi

# replace stuff
sed "s_<em:targetApplication>_\
<em:targetApplication>\
<!-- Prism -->\
<Description>\
<em:id>prism@developer.mozilla.org</em:id>\
<em:minVersion>0.4</em:minVersion>\
<em:maxVersion>1.0.0.*</em:maxVersion>\
</Description>\
</em:targetApplication>\
&_" < $installRdfFile > $tempRdfFile
mv $tempRdfFile $installRdfFile

# rebuild the package
pushd $tempDir > /dev/null
rm $tempZipFile # i just needed the name, not the actual file
zip -r $tempZipFile * > /dev/null
popd > /dev/null
mv $tempZipFile $xpiFile

cleanup
Just save the below as mkPrismXpi.sh, make it executable, and run it as such:
./mkPrismXpi.sh myAddon.xpi

Thursday, July 16, 2009

Syntax Highlighting on Blogger

I put some code in my first post and it took a little effort to make it look pretty, so here is exactly what I did to make your life easier.

While customizing your blog, go to the "Layout" tab, then click "Edit HTML" at the top. Add the following lines inside the <head> element:
<link href="http://alexgorbatchev.com/pub/sh/current/styles/shCore.css" rel="stylesheet" type="text/css">
<link href="http://alexgorbatchev.com/pub/sh/current/styles/shThemeDefault.css" id="shTheme" rel="stylesheet" type="text/css">
Also, paste the following at the very bottom, right before the closing of </html>:
<script src='http://alexgorbatchev.com/pub/sh/current/scripts/shCore.js' type='text/javascript'/>
<script src='http://alexgorbatchev.com/pub/sh/current/scripts/shBrushBash.js' type='text/javascript'/>
<script src='http://alexgorbatchev.com/pub/sh/current/scripts/shBrushCpp.js' type='text/javascript'/>
<script src='http://alexgorbatchev.com/pub/sh/current/scripts/shBrushCSharp.js' type='text/javascript'/>
<script src='http://alexgorbatchev.com/pub/sh/current/scripts/shBrushCss.js' type='text/javascript'/>
<script src='http://alexgorbatchev.com/pub/sh/current/scripts/shBrushDelphi.js' type='text/javascript'/>
<script src='http://alexgorbatchev.com/pub/sh/current/scripts/shBrushDiff.js' type='text/javascript'/>
<script src='http://alexgorbatchev.com/pub/sh/current/scripts/shBrushGroovy.js' type='text/javascript'/>
<script src='http://alexgorbatchev.com/pub/sh/current/scripts/shBrushJava.js' type='text/javascript'/>
<script src='http://alexgorbatchev.com/pub/sh/current/scripts/shBrushJScript.js' type='text/javascript'/>
<script src='http://alexgorbatchev.com/pub/sh/current/scripts/shBrushPhp.js' type='text/javascript'/>
<script src='http://alexgorbatchev.com/pub/sh/current/scripts/shBrushPlain.js' type='text/javascript'/>
<script src='http://alexgorbatchev.com/pub/sh/current/scripts/shBrushPython.js' type='text/javascript'/>
<script src='http://alexgorbatchev.com/pub/sh/current/scripts/shBrushRuby.js' type='text/javascript'/>
<script src='http://alexgorbatchev.com/pub/sh/current/scripts/shBrushPerl.js' type='text/javascript'/>
<script src='http://alexgorbatchev.com/pub/sh/current/scripts/shBrushScala.js' type='text/javascript'/>
<script src='http://alexgorbatchev.com/pub/sh/current/scripts/shBrushSql.js' type='text/javascript'/>
<script src='http://alexgorbatchev.com/pub/sh/current/scripts/shBrushVb.js' type='text/javascript'/>
<script src='http://alexgorbatchev.com/pub/sh/current/scripts/shBrushXml.js' type='text/javascript'/>
<script src='http://alexgorbatchev.com/pub/sh/current/scripts/shBrushAS3.js' type='text/javascript'/>
<script src='http://alexgorbatchev.com/pub/sh/current/scripts/shBrushJavaFX.js' type='text/javascript'/>
<script src='http://alexgorbatchev.com/pub/sh/current/scripts/shBrushPowerShell.js' type='text/javascript'/>
<script type='text/javascript'>
SyntaxHighlighter.config.bloggerMode = true;
SyntaxHighlighter.config.clipboardSwf = 'http://alexgorbatchev.com/pub/sh/current/scripts/clipboard.swf';
SyntaxHighlighter.all();
</script>
Now, if you want to post a block of code, edit the HTML of your blog and simply add it as a preformatted block, and specify one of the available languages being used as part of the class. Here is an example:
<pre class="brush:java">
System.out.println("Hello world!");
</pre>
The only thing left to worry about is that you cannot embed < and > symbols. Instead, use &lt; and &gt; respectively.

That's it! No need to host any files; just copy and paste! I should also mention that the following websites did most of the work for me:

Getting the Palm Mojo SDK to work on 64-bit linux

This is my first post, and I hope you will find it helpful.

Today, Palm released the Mojo SDK to the public. Awesome! I've been meaning to try developing for a mobile platform and have been put off by the iPhone's price and the fact that it only runs on a Mac. Palm's SDK claims to be cross-platform, but the .deb package it has available for linux is built for i386 only. I have Ubuntu 9.04 (Jaunty) on my machine in x86-64 mode so I was really bummed when I wasnt allowed to install the package.

Determined to get it working I dug around in the package (any .deb can be opened as a .tar.gz) and found that most tools are just scripts, which shouldnt care about the platform they run under. Now how do I fool the installer to use the package they gave me? It turns out there is a file in each .deb that specifies which architecture the package is for. If you look inside the .deb you will find a file called control.tar.gz, and in that archive you will find a file called "control" which is just a list of properties, one of which is "Architecture". Change it from "i386" to "all" and you're all set!

Since the file is kind of deep in the .deb, its not trivial to edit the "control" file, so here is a script that will do it for you:

#!/bin/bash
packageName=$1
tempDir=`mktemp -d`
architecture="all"

# extract the files from the original package
mkdir $tempDir/DEBIAN
ar p $packageName control.tar.gz | tar -xz --directory $tempDir/DEBIAN
ar p $packageName data.tar.gz | tar -xz --directory $tempDir

# replace stuff
if [ -n "$controlFile" ]; then
cp $controlFile $tempDir/DEBIAN/control
fi
if [ -n "$architecture" ]; then
sed "s/Architecture:.*/Architecture: $architecture/g" < $tempDir/DEBIAN/control > $tempDir/DEBIAN/control2
mv $tempDir/DEBIAN/control2 $tempDir/DEBIAN/control
fi

# rebuild the package
dpkg --build $tempDir $packageName

# get rid of temporary working files
rm -rf $tempDir
To use it, save as debAllArch.sh and run it from the terminal:
./debAllArch.sh mojo.deb